 AtoZfitness – Free Fitness Magazine Publishing Only The best Fitness Articles & The Best FItness Products
Note: This is a guest article by John Sifferman, author of The Pull-up Solution.
Pull-ups and chin-ups are some of the best exercises you can do for building and strengthening your upper body. The problem is that they’re really hard for a lot of people. If that’s you, this article will help you get better at pull-ups as fast and as safely as possible.
Pull-ups vs Chin-ups
First things first, the names “pull-ups” and “chin-ups” are often used interchangeably. But they’re actually two similar, but distinct, vertical pulling exercises. The only difference in a practical sense is how you grip the bar.
With the pull-up, you grip the bar with an overhand (i.e. pronated) grip, with your palms facing away from you. With the chin-up, you grip the bar with an underhand (i.e. supinated) grip, with your palms facing towards you. Other than that, the two exercises are virtually the same. However, pull-ups tend to emphasize your back muscles a little more. Whereas, chin-ups tend to emphasize your biceps a little more.
There are many other vertical pulling exercises in the “pull-up family,” such as neutral-grip pull-ups, commando pull-ups, alternate grip pull-ups, and others.
Why Pull-ups?
When it comes to upper body strength and muscle development, pull-ups and chin-ups are some of the best options available. They’ll help you build and sculpt your back, arms, shoulders, and core musculature. They’re also very functional, even practical, and very satisfying, once you get the hang of them. And for a lot of people, getting your first pull-up is very empowering. It’s also a sign of good pound for pound strength, among a long list of other benefits. The fact is that pull-ups do your body good.
How to do a Pull-up with Proper Form
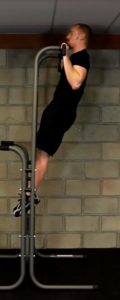
Setup: Grab a pull-up bar with an overhand grip (including your thumb), making sure that your wrist is hanging straight (i.e. neutral position), your arms are straight (i.e. elbows locked), and your shoulders are stabilized on your torso (i.e. “packed down”). Maintain a neutral spine, keeping your core, glutes, and thighs active throughout the full range of motion.
Execution: Exhale, tightening your core, and begin to pull your shoulders down and back in combination with pulling your elbows down toward your ribs. Keep pulling until you reach the top position (i.e. with your chin over the bar, chest near the bar), and pause for a moment, before lowering yourself down with a passive inhale until you reach full elbow lockout. Perform the pulling movement quickly and the downward movement slowly, under control. Repeat for reps.
Those are the basics, but there’s actually a lot more! Here’s a video where I walk you through the subtle details of optimal pull-up form. I guarantee you’ll learn something new from this tutorial, even if you’re been doing pull-ups for years.
A lot of people find that they instantly increase their pull-up strength after making some of these changes. Some have been able to increase their pull-up reps or even get their first pull-up just from following some if the advice in this video.
Common Mistakes
1) Not using a full range of motion – Make sure you lock your elbows in the bottom position each and every rep. This is the hardest and the most important position to strengthen, but it’s worth it if you’d like to maximize your results and minimize the risk of injury.
2) Straining the neck to get your chin over the bar – Keep your spine in a neutral position throughout the full range of motion, from the crown of your head to the tip of your tailbone (i.e. coccyx). Do not tilt your head back.
3) Letting your lower back arch – Keep your spine lengthened and supported with a strong core contraction.
4) Performing your reps too fast – Perform your reps in a controlled manner, throughout the full range of motion. You should be able to stop at any point during the exercise and “stick” the position. It is especially important that you avoid “falling” or “bouncing” into the bottom, deadhang position (i.e. to help prevent shoulder injuries).
5) Holding your breath – Exhale forcefully out of your mouth upon the pull, contracting your core to squeeze the air out of your lungs. Then allow the air to get sucked back into your lungs as you relax them on the way down.
Best Pull-up Workouts
Here are a few workouts that work exceptionally well for building your pull-up strength and reps. You can either pick one of these workouts and do it 2-3x per week for a month. Or, you can do alternate between the three workouts every week. For example:
Monday: Ladder Workout
Wednesday: Max Effort Workout
Friday: Endurance Workout
Pull-ups Ladder Workout
Instructions: Do one pull-up, then rest for about 10 seconds. Do two pull-ups, then rest for about 20 seconds. And continue this progression until you max out and can’t complete the next level. Then work your way back down the ladder by doing one less repetition each set.
For example:
Set 1: 1 rep
Set 2: 2 reps
Set 3: 3 reps
Set 4: 4 reps
Set 5: 5 reps
Set 6: 5 reps (max – missed 6th rep)
Set 7: 4 reps
Set 8: 3 reps
Set 9: 2 reps
Set 10: 1 rep
Pull-ups Max Effort Workout
Instructions: After a warmup, complete 3-5 max or near-max sets of pull-ups, gradually increasing your intensity each set. Rest 2-3 minutes between sets.
For example:
Set 1: 80% of max reps
Set 2: 85% of max reps
Set 3: 90% of max reps
Set 4: 95% of max reps
Set 5: 100% of max reps
Pull-ups Endurance Workout
Instructions: Select a repetition number that’s approximately half of your maximum ability. So, if you can do 10 pull-ups during a test, your number is 5 reps. Complete 10-20 sets, resting no more than 30 seconds between sets.
For example:
Set 1: 5 reps
Set 2: 5 reps
Set 3: 5 reps
Set 4: 5 reps
Set 5: 5 reps
Set 6: 5 reps
Set 7: 5 reps
Set 8: 5 reps
Set 9: 5 reps
Set 10: 5 reps
How to Get Your First Pull-up
If you can’t do any pull-ups yet, don’t worry! Anyone can get better at pull-ups. It’s just a matter of proper training. The key is specificity. And practice – lot’s of practice!
Now, the best thing you can do to quickly work up to your first pull-up is to practice the hardest pull-up exercise that you can perform with proper form as often as you can. While tools like the lat pulldown machine and assisted pull-up machine can be helpful in certain cases, it’s generally best to begin with an actual pull-up bar, assuming you’re able to support some of your weight while hanging.
So, if you can hang from a pull-up bar, you’re already off to a good start. And in my experience, most people who are reasonably fit and a healthy weight can get their first pull-up within several weeks of focused training – some much sooner.
But before you get to programming, you need to choose the best exercise for your current skill and conditioning level. Here are some of the basic pull-up progressions. You can think of these as stepping stones to full pull-ups.
Level 1: Dead Hangs

Instructions: Hanging from the bar with elbows locked and shoulders packed (i.e. stabilized on the torso), focus on core activation and maintaining spinal alignment.
Goal: 30+ second dead hang.
Level 2: Flexed-Arm Hangs (with Pull-up or Chin-up Grip)
Instructions: Hanging from the bar with your elbows fully flexed (i.e. with chin over the bar), focus on keeping your elbows in tight toward your sides while maintaining proper spinal alignment and core activation.
Goal: 30+ second flexed-arm hang.
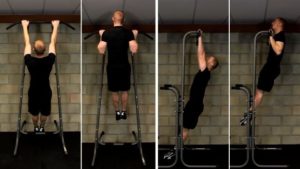
Level 3: Negative Rep Pull-ups (with Pull-up or Chin-up Grip)
Instructions: These involve a half of a pull-up repetition – only the lowering phase. To perform negative rep pull-ups, begin in a flexed-arm hang and lower yourself slowly, under control – over 2-5 seconds if you can – until you reach the bottom dead hang position and achieve full elbow lock. Get yourself back into a flexed-arm hang (using a bench/chair to step up, or even by jumping up to the top position) and repeat for repetitions.
Goal: 5-10 negative reps.
Tip: Once you can perform negative pull-up reps smoothly, under control, continue to supplement your training with inverted rows, flexed-arm hangs, dead hangs, and other core exercises, if necessary.
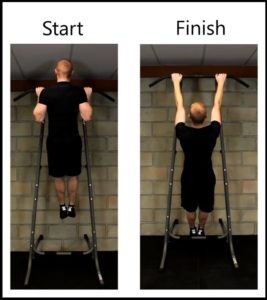
Level 4: Assisted Pull-ups (with Pull-up or Chin-up Grip)
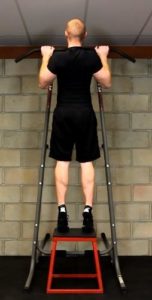
Instructions: This involves moving through the full range of motion of the pull-up exercise, but using some form of assistance or support to help you throughout each repetition. There are many ways to do them, such as with a partner to help you, using a resistance band, pushing off of a chair or bench with your feet, or even just jumping to help you get up to the bar each repetition. The key is finding a method that works for you and will tap into the “sweet spot” of strength adaptation. That is, the reps should be challenging, but you should be able to complete them smoothly.
Important point: Use the LEAST amount of assistance necessary to complete your reps.
Goal: 5-10 assisted reps with minimal assistance
Level 5: Pull-ups (i.e. Standard Deadhang Pull-ups or Chin-ups)
Once you can do 5-10 negative reps and/or minimally-assisted reps, you should be very close to being able to complete a standard, deadhang pull-up without any assistance at all. This is the real deal. So, go ahead and give it a try!
Goal: 1 rep, performed smoothly and under control.
Note: many people find chin-ups to be a little easier than pull-ups, and often get their first chin-up before their first pull-up.
How to Increase Your Pull-up Numbers Fast and Break a Plateau
Pull-ups and chin-ups respond very well to practice.
The key is that you train them consistently and keep pushing your limits – trying to progress gradually from workout to workout. So, assuming you adhere to those two things, there are many ways you can program your pull-up training (e.g. straight sets, supersets, circuits, density training, linear progression, high volume training, high frequency training, 5×5, 5×3, 4×8, etc.).
The bottom line is that almost any decent workout program will improve your pull-ups if you put in the effort.
That said, the fastest way to increase your pull-up and chin-up numbers is to grease the groove, which involves practicing them as often as you can fully and safely recover from training.
Here’s how to grease the groove with your pull-ups:
1) Perform a moderate intensity set of pull-ups several times per day, several days per week.
2) Select a repetition amount that falls between 40-80% of your maximum reps (e.g. if you can do 10 pull-ups, do sets of 4-8 reps).
3) Do at least 3-5 sets, and up to 10 or more total sets throughout the day. If you can do less than 5 pull-ups, do a lot of sets daily (e.g. 10+ total sets). If you can do 5-15 reps, do a moderate amount of sets daily (e.g. 5-10 sets). If you can do 16-30+ reps, do fewer sets per day (e.g. 3-5 sets).
4) Allow plenty of rest between sets (e.g. 15-60+ minutes), avoiding muscle failure, fatigue and exhaustion.
5) Train as often as you can fully and safely recover, for at least 4 and no more than 6 days per week. More often is better, but only if your body can handle the workload.
6) Increase the number of pull-ups you complete every day you train to increase your total training volume each week (i.e. do slightly more sets and/or reps every workout)
Final Words
Pull-ups aren’t easy. And there’s no “secret tip” or “1 weird trick” to getting better at them. You’ve just got to put in the work, day in and day out. If you apply the strategies explained above, and train not just hard, but smart, you’ll be well on your way to getting your first proper pull-up. Or, even your first 10, 20, or even 30 reps.
In fact, many people are surprised at how quickly they start seeing results (i.e. usually within 1-2 weeks) once they finally start training properly. So, if you’re ready to do the work, get started today. You’ll be amazed at what you can accomplish in just a few weeks time, especially if your training is finally optimized instead of randomized.
Want to do More Pull-ups?
Click Here to Learn How To Rapidly Increase Your Pull-up & Chin-up Numbers In 3 Months Or Less
About the Author
John Sifferman is a health-first fitness coach and the author of The Pull-up Solution: The Complete Pull-up and Chin-up Training System, which helps people rapidly increase their pull-up numbers in three months or less. using a unique twist on pull-up training. You can learn how John dramatically improved his pull-ups performance, and has helped thousands of people do the same, at his website www.ThePullupSolution.com.
